I haven't had internet for a couple weeks, but I am back now. With that said, while I was away and had no contact with the cyber world I made sure that I did many awesome things for my wedding - which is coming up in just 19 days!!!!!
These are all Do-It-Yourself crafts that I have made with items from The Dollar Tree, Building 19, Michael's Craft Store, Joanne's Fabrics, Walmart & Staples. Here you go - any questions email/write me.
Important:
Make sure you have a Hot Glue Gun and Glue sticks for these projects - at Walmart $4.99
I also used alot of Vellum Paper ( which is like Tracing Paper) - at Staples $11.99/package
I also used alot of Plain White Paper from my home computer, I used Microsoft Works ( I dont have Word)
Alot of Different Color/Shaped Ribbons - from Walmart, Michaels, or Joann's for $.99-$4.99/each
V.I.P Head Table Numbers
( Which I am using for my Parent/Sibling tables )
-Large Corinthian Candles (which I purchased for $1.00 each at Dollar Tree)
-Clean the Candles to ensure the glue will stick
-Print out your Design from your home computer/printer onto the Vellum Paper
-Wrap the vellum paper around the candle & use the hot glue gun to glue on
My candles have the table number and an exerp from the Bible -
"Love is patient, love is kind. It does not envy, it does not boast, it is not proud. It is not rude, it is not self-seeking, it is not easily angered, it keeps no record of wrongs. Love does not delight in evil but rejoices with the truth. It always protects, always trusts, always hopes, always perseveres"
Aswell as, "Felicty & Paul Merrill, August 29th 2010"
Table Number Candle Votives
-Clean the Votives to ensure the glue will stick properly
-Print out what you want the candles to say onto the vellum paper (which is like tracing paper)
-Fit the vellum paper around the candle, cut, and glue on with a hot glue gun
(one strip of glue on the candle and then where the paper overlaps is just fine)
-Then glue the ribbon around the bottom of the candle
-Glue the fancy damask paper clips (or whatever you are using) onto each candle
-Print out table numbers & use a paper cutter to cut exact size for each one
My candles say - "Thank You for Sharing Our Special Day,
on this Sunday of August the 29th 2010, Mrs. and Mr. Felicity and Paul Merrill"
Personalized Candle Votives
-Clean the Votives to ensure the glue will stick properly
-Print out what you want the candles to say onto the vellum paper
-Fit the vellum paper around the candle, cut, and glue on
-Tie little bows with the Ribbon & glue onto the candles
-Glue on little diamond accents or other embellishments
My personalized candles say - "Felicity and Paul, August 29, 2010, Mr. and Mrs. Merrill"
Designed in a repeated pattern using different fonts & colors on each line.
Bride & Groom Candle
-Clean the Votives to ensure the glue will stick properly
-Print out what you want the candles to say onto the vellum paper once again
-Fit the vellum paper around the candle, cut, and glue on
-Cut a strip of fancy Ribbon going upwards on the overlap of the paper
-Glue on another piece of Fancy vertical Ribbon
-Glue on more accent pieces - I used diamonds!
My Bride candle says, "Bride, Felicity Eliza"
My Groom candle says, "Groom, Paul Francis"
Head Table Candles
( one for the Bride's Maid table & one for the Groom's Men table )
-Large cylinder Vase perchused at The Dollar Tree for $1.00/each
-Cleaned the glass, printed on the vellum paper, glued onto the Vase
-Filled each Vase with Purple Sand which I got at The Dollar Tree for $1.00/each
Also stuck in a beautiful Tapered Candle from The Dollar Tree for $1.00/package of 4
-Then I glued on a designer ribbon around each Vase
These candles say, "Mr. and Mrs. Felicity and Paul Merrill"
"Love is patient, love is kind. It does not envy, it does not boast, it is not proud. It is not rude, it is not self-seeking, it is not easily angered, it keeps no record of wrongs. Love does not delight in evil but rejoices with the truth. It always protects, always trusts, always hopes, always perseveres"
"August 29th 2010"
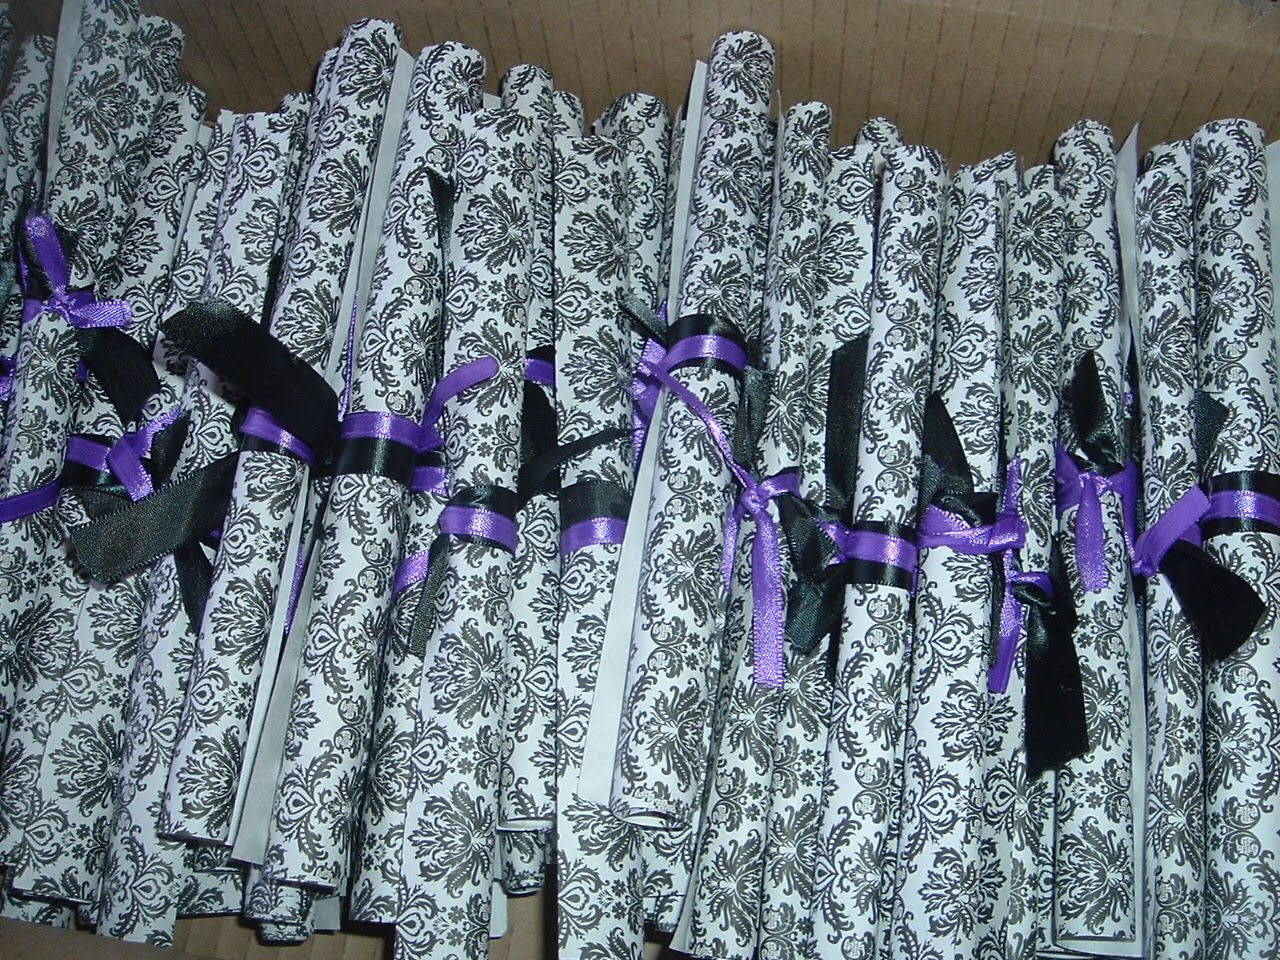
Program Scrolls
-Use fancy paper. I bought this paper above at Staples for $9.99/package
( the front has a damask footer/header and the back is a repeated damask pattern )
-Design a personalized Program which includes the bridal party or the Food Menu
( on mine I included my bridal party and my ceremony reading aswell as our monogram)
-Print onto this paper from your home computer or have a friend help if you aren't too saavy
-Roll into iddy biddy scrolls and wrap one or two pieces of ribbon around & tie shut
These are a great touch to any table or ontop of a charger plate & napkin!
Personalized Confetti
-You will need a HOLE PUNCHER for this project
( I used a 1.50'' inch hole puncher which I purchased at Joann's Fabrics for $9.99 )
-I did a repeated, spaced out pattern on my computer (Microsoft Word or Works will do)
-Use different fonts and different font colors & Print out onto the Vellum paper
-Then use the hole puncher to cut out each piece! Voila! You got confetti!
Ring Bearer's Pillow
-Cheap pillow from The Dollar Tree for $1.00
( I cut off the ribbon that was already around it. I know! Who would have thought!? )
-Use a beautiful thick Patterned Ribbon (or fabric) and glue around the pillow
-Then take a slimmer ribbon (or fabric) and glue ontop of the prior ribbon
-Glue an embellishment into the center of each side of pillow
( I used a large diamond piece that I actually cut from old flip-flops haha
But you could use your last name Initial or anything you'd like )
Personalized Guest Book
-Guest book purchased at Joann's Fabrics for $14.99 (came in nice box w/attached pen)
( Also - this book came with the tooling & heart embellishment at the top so I was lucky)
-Glue onto the bottom of the book (open & glue inside aswell as a continued pattern from outside)
the Fancy thick Ribbon you used for Ring pillow & then the smaller thin ribbon
-Then wrap each piece of ribbon around the pen and glue that on aswell to match!
-Glue on an Initial embellishment or Jewel. I used an "M" for my new last name, Merrill.
Which I puchased a package of alphabets from Joann's on clearance for a buck!!!!
Personalized Card Box
-Purchase a cheap or a fancy card box anywhere
( I got mine already satin, with diamond accent top at Joann's for $24.99)
-Glue on the same fancy thick & thin ribbon or fabric you used for your ring pillow & guest book
around the center of the box (going all the way around the box)
-Place your Initial onto the front & use the hot glue gun to glue
( I got my letter at Michael's for $1.99 I think and just kept it white without painting it )
-Stick a fancy bow, ribbon, or fake matching flowers ontop if you want
Main Flower Girl's Bouquet
This bouquet will be used by my step-daughter,
she is too young to be a bride's maid but to old to carry a flower basket.
And to be quite honest, I couldn't afford another $50-100 bouquet from my Florist.
All I did was purchase 3 fake purple roses from Michaels at $1.19/each
-Cut all the leaves off of the stems (you will glue them back on later)
-Wrap the 3 flowers together with fancy ribbon (and glue on together)
-Use tooling & other thin ribbon to make 2 bows and tie (aswell as glue onto bouquet)
-Once my bouquet was done I glued the leaves back on, at just the top of the bouquet as you can see.
By all means, if you cannot afford a florist you could do this with all of your bouquets.
These are my Bride's Maids bouquets that I purchased from a florist
Here is Most of my matching Wedding Decor
As you can see I went with a Damask black & white pattern with Purple accents
I had a blast using my home computer printing on the Vellum paper,
and I always used different designs, and different colored fonts also -
which I placed on different sized candles and glass vases.
You can do the same to give your wedding a personalized feel, for cheap!!
I also made a ton of personalized wine glasses as Gifts for my Bride's Maids and other people who helped me with this wedding - my Justice of the Peace, Photographer, Cake Designer, etc.
Pictures and Post next time ;)